Lab 5: Data Governance with Dataplex
caution
You are viewing this lab from the handbook. This lab is meant to be loaded as Cloud Shell tutorial. Please see the labs section on how to do so.
In this lab you will
- Understand Dataplex product capabilities.
- Leverage Dataplex to understand and govern your data and metadata.
- Build data quality checks on top of the fraud detection prediction results.
About Dataplex
Dataplex is a data governance tool which helps you organize your data assets by overlaying the organizational concept of “Lakes” and “Zones”. This organization is logical only and does not require any data movement. You can use lakes to define, for example, organizational boundaries (e.g. marketing lake/sales lake) or regional boundaries (i.e. US lake/ UK lake), while zones are used to group data within lakes by data readiness or by use cases (e.g. raw_zone/curated_zone or analytics_zone/data_science_zone).
Dataplex can also be used to build a data mesh architecture with decentralized data ownership among domain data owners.
Security - Cloud Storage/BigQuery
With Dataplex you can apply data access permissions using IAM groups across multiple buckets and BigQuery datasets by granting permissions at a lake or zone-level. It will do the heavy lifting of propagating desired policies and updating access policies of the buckets/datasets that are part of that lake or data zone.
Dataplex will also apply those permissions to any new buckets/datasets that get created under that data zone. This takes away the need to manually manage individual bucket permissions and also provides a way to automatically apply permissions to any new data added to your lakes.
Note that the permissions are applied in “Additive” fashion - Dataplex does not replace the existing permissions when pushing down permissions. Dataplex also provides “exclusive” permission push down as an opt-in feature.
Discovery [semi-structured and structured data]
You can configure discovery jobs in Dataplex that can sample data on GCS, infer its schema, and automatically register it with the Dataplex Catalog so you can easily search and discover the data you have in your lakes.
In addition to registering metadata with Dataplex Catalog, for data in CSV, JSON, AVRO, ORC, and Parquet formats, the discovery jobs also register technical metadata, including hive-style partitions, with a managed Hive metastore (Dataproc Metastore) & as external tables in BigQuery (BQ).
Discovery jobs can be configured to run on a schedule to discover any new tables or partitions. For new partitions, discovery jobs incrementally scan new data, check for data and schema compatibility, and register only compatible schema to the Hive metastore/BQ so that your table definitions never go out of sync with your data.
Actions - Profiling, Quality, Lineage, Discovery
Dataplex has the capability to profile data assets (BigQuery tables), auto detect data lineage for BigQuery transformations. You can also use it for data discovery across GCS, BigQuery, Spanner, PubSub, Dataproc metastore, Bigtable and Vertex AI models.
You can automate the scanning of data, validate data against defined rules, and log alerts if your data doesn’t meet quality requirements. In addition you can manage data quality rules and deployments as code, improving the integrity of data production pipelines.
Create a Dataplex Lake
- Go to Dataplex.
- Navigate to
Manage . - Click
Create . - Enter the following details:
- Display name:
bootkon-lake - Description: anything you like
- Region:
us-central1 - Labels: Add labels to your lake. For example, use location for the key and berlin for the value over your data
- Metastore: lets skip the metastore creation for now
- Display name:
- Finally, click on
Create . This should take around 2-3 minutes.
Add Dataplex Zones
We will add two zones: one for raw data and another for curated data.
- Click on the
bootkon-lake lake you just created. - In the Zones tab, click
+ Add Zone and enter the following details:- Display name:
bootkon-raw-zone - Type: Raw Zone
- Description: anything you like
- Data Locations:
Regional (us-central1) - Discovery settings: Enable metadata discovery, which allows Dataplex to automatically scan and extract metadata from the data in your zone. Let’s leave the default settings. Set time zone to Germany.
- Display name:
Finally, click
Repeat the same steps but this time, change the display name to bootkon-curated-zone and choose Curated Zone for the Type. You might also change the label and description values.
The creation should take 2-3 minutes to finish.
Add Zone Data Assets
Let’s map data stored in Cloud Storage buckets and BigQuery datasets as assets in your zone.
- Navigate to Zones and click on
bootkon-raw-zone - Click
+ ADD ASSETS - Click
ADD AN ASSET - Choose Storage bucket from the type dropdown
- Display name :
bootkon-gcs-raw-asset - Optionally add a description
- Browse the bucket name and choose
<PROJECT_ID>-bucket. - Select the bucket
- Let’s skip upgrading to the managed option. When you upgrade a Cloud Storage bucket asset, Dataplex removes the attached external tables and creates BigLake tables. We have already created a BigLake table in Lab 2 so this option is not necessary.
- Optionally add a label
- Click
Continue - Leave the discovery setting to be inherited by the lake settings we have just created during lake creation steps. Click on
Continue . - Click
Submit .
Now let’s add another data asset but for the bootkon-curated-zone:
- Click on
bootkon-curated-zone - Click on
+ ADD ASSETS - Click
ADD AN ASSET - Choose BigQuery dataset from the Type dropdown
- Display name :
bootkon-bq-curated-asset - Optionally add a description
- Browse the BigQuery dataset and choose the dataset created in lAB 1. If you followed the instructions, it should be named
<PROJECT_ID>.ml_datasets. - Select the BigQuery dataset
- Optionally add a label
- Click on
Continue . - Leave the discovery setting to be inherited by the lake settings we have just created during lake creation steps. Click
Continue . - Click
Submit .
Explore data assets with Dataplex Search
During this lab go to the Search section of the Dataplex and search for the lakes, zones and assets you just created. Spend 5 minutes exploring before moving to the next section.
Explore Biglake object tables created automatically by Dataplex in BigQuey
As a result of the data discovery (takes up to approximately 5 minutes), notice a new BigQuery dataset created called bootkon_raw_zone under the BigQuery console section. New Biglake tables were automatically created by Dataplex discovery jobs. During the next sections of the labs, we will be using the data_predictions BigLake table.
Data Profiling
Dataplex data profiling lets you identify common statistical characteristics of the columns in your BigQuery tables. This information helps you to understand and analyze your data more effectively.
Information like typical data values, data distribution, and null counts can accelerate analysis. When combined with data classification, data profiling can detect data classes or sensitive information that, in turn, can enable access control policies. Dataplex also uses this information to recommend rules for data quality check and lets you better understand the profile of your data by creating a data profiling scan.
These are some of the options we will be dealing with when setting up data profiling.
Configuration options: This section describes the configuration options available for running data profiling scans.
Scheduling options: You can schedule a data profiling scan with a defined frequency or on demand through the API or the Google Cloud console.
Scope: As part of the specification of a data profiling scan, you can specify the scope of a job as one of the following options:
- Full table: The entire table is scanned in the data profiling scan. Sampling, row filters, and column filters are applied on the entire table before calculating the profiling statistics.
- Incremental: Incremental data that you specify is scanned in the data profile scan. Specify a Date or Timestamp column in the table to be used as an increment. Typically, this is the column on which the table is partitioned. Sampling, row filters, and column filters are applied on the incremental data before calculating the profiling statistics.
Filter data: You can filter the data to be scanned for profiling by using row filters and column filters. Using filters helps you reduce the execution time and cost, and exclude sensitive and unuseful data.
- Row filters: Row filters let you focus on data within a specific time period or from a specific segment, such as region. For example, you can filter out data with a timestamp before a certain date.
- Column filters: Column filters lets you include and exclude specific columns from your table to run the data profiling scan.
Sample data: Dataplex lets you specify a percentage of records from your data to sample for running a data profiling scan. Creating data profiling scans on a smaller sample of data can reduce the execution time and cost of querying the entire dataset.
Let’s get started:
- Go to the
Data profiling & quality section in Dataplex. - Click
Create data profile scan - Set Display Name to
bootkon-profile-fraud-predictionfor example - Optionally add a description. For example, “data profile scans for fraud detection predictions”
- Leave the “Browse within Dataplex Lakes” option turned off
- Click on
BROWSE to select thedata_predictionsBigQuery table (Dataset:bootkon_raw_zone). SELECT data_predictionsbigquery table- Choose “Entire data” in the dropdown as the
Scope for the data profiling job - Choose “All data” in the
Sampling size dropdown - Select the checkbox for “Publish results to BigQuery and Dataplex Catalog UI”
- Choose On-demand schedule
- Click
CONTINUE , leave the rest as default and clickCREATE
It will take a couple of minutes for the profiling to show up on the console.
- Click on the
bootkon-profile-fraud-predictionprofile and then clickRUN NOW - Click on the
Job Idand monitor the job execution - Notice what the job is doing. The job should succeed in less than 10 minutes
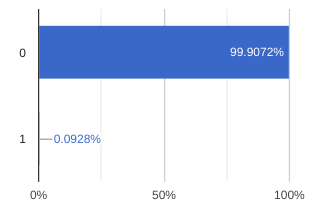
- Explore the data profiling results of the
Classcolumn name. We have less than 0.1% of fraudulent transactions. Also notice thatpredicted_classof typeRECORDwere not fully profiled, only the percentage of null and unique values were correctly profiled. Refer to the supported data types here
- As they train further continuously the fraud detection ML models, data professionals would like to set up an automatic check on data quality and be notified when there are huge discrepancies between
predicted_classandClassvalues. This is where Dataplex data quality could help the team.
Setup Data Quality Jobs
After setting up the data profiling scan we have seen that we still have no clear visibility on fluctuation between predicted_classes vs actual Class ratio. Our goal is to have a percentage of matched values between Class and predicted_classes more than 99.99 %. Any lower percentage would indicate that we would have to further train the ML model or add more features or use another model architecture.
You can use the following SQL query in BigQuery to check the percentage of matched values between Class and predicted_classes.
WITH RankedPredictions AS (
 SELECT
   class,
   ARRAY(
     SELECT AS STRUCT classes, scores
     FROM UNNEST(predicted_class.classes) classes WITH OFFSET AS pos
     JOIN UNNEST(predicted_class.scores) scores WITH OFFSET AS pos2
     ON pos = pos2
     ORDER BY scores DESC
     LIMIT 1
   )[OFFSET(0)].*
 FROM
   `<PROJECT_ID>.bootkon_raw_zone.data_predictions`
)

SELECT
 SUM(CASE WHEN class = CAST(highest_score_class AS STRING) THEN 1 ELSE 0 END) * 100.0 / COUNT(*)  AS PercentageMatch
FROM (
 SELECT
  class,classes AS highest_score_class
 FROM
   RankedPredictions
)
We will set up the Dataplex automatic data quality, which lets you define and measure the quality of your data. You can automate the scanning of data, validate data against defined rules, and log alerts if your data doesn’t meet quality requirements. You can manage data quality rules and deployments as code, improving the integrity of data production pipelines.
During the previous lab, we got started by using Dataplex data profiling rule recommendations to drive initial conclusions on areas of attention. Dataplex provides monitoring, troubleshooting, and Cloud Logging alerting that’s integrated with Dataplex auto data quality.
Conceptual Model
A data scan is a Dataplex job which samples data from BigQuery and Cloud Storage and infers various types of metadata. To measure the quality of a table using auto data quality, you create a DataScan object of type data quality. The scan runs on only one BigQuery table. The scan uses resources in a Google tenant project, so you don’t need to set up your own infrastructure. Creating and using a data quality scan consists of the following steps:
- Rule definition
- Rule execution
- Monitoring and alerting
- Troubleshooting
Lab Instructions
-
Go to the
Data profiling & quality section in the left hand menu of Dataplex. -
Click on
Create data quality scan -
Display Name:
bootkon-dquality-fraud-predictionfor example -
Optionally add a description. For example, “data quality scans for fraud detection predictions”
-
Leave the “Browse within Dataplex Lakes” option turned off
-
Click
BROWSE to filter on thedata_predictionsBigQuery table (Dataset:bootkon_raw_zone) -
SELECT data_predictionsBigQuery table -
Choose “Entire data” as the
Scope of the data profiling job -
Choose “All data” for
Sampling size -
Leave on the option “Publish results to BigQuery and Dataplex Catalog UI”
-
Choose On-demand as the scan schedule
-
Click
CONTINUE
Now let’s define quality rules. Click on the SQL Assertion Rule
- Choose
Accuracyas dimension - Rule name:
bootkon-dquality-ml-fraud-prediction - Description :
Regularly check the ML fraud detection prediction quality results - Leave the column name empty
- Provide the following SQL statement. Dataplex will utilize this to create a SQL clause of the form SELECT COUNT(*) FROM (sql statement) to return success/failure. The assertion rule is passed if the returned assertion row count is 0.
WITH RankedPredictions AS (
 SELECT
   class,
   ARRAY(
     SELECT AS STRUCT classes, scores
     FROM UNNEST(predicted_class.classes) classes WITH OFFSET AS pos
     JOIN UNNEST(predicted_class.scores) scores WITH OFFSET AS pos2
     ON pos = pos2
     ORDER BY scores DESC
     LIMIT 1
   )[OFFSET(0)].*,
 FROM
   `<PROJECT_ID>.bootkon_raw_zone.data_predictions`
)

SELECT
 SUM(CASE WHEN class = CAST(highest_score_class AS STRING) THEN 1 ELSE 0 END) * 100.0 / COUNT(*)  AS PercentageMatch
FROM (
 SELECT
   class,
   classes AS highest_score_class
 FROM
   RankedPredictions
)
   HAVING PercentageMatch <= 99.99
- Click
ADD - Click
CONTINUE RUN SCAN (The display name may take a moment to appear on the screen)- Monitor the job execution. Notice the job succeeded but the rule failed because our model accuracy percentage on the whole data predicted does not exceed the 99.99% threshold that we set
- You may need to choose
RUN NOW in order to see the results of thebootkon-dquality-fraud-predictiondata quality scan
Success
🎉 Congratulations ! 🚀
You’ve successfully completed the Data & AI Boot-Kon Dataplex lab! You’ve gained a solid understanding of Dataplex, creating lakes and zones, and adding assets from GCS and BigQuery.
You built data profiling and quality checks, exploring assets and setting up monitoring for fraud detection predictions. Even with the accuracy not yet at 99.99%, you’ve established monitoring for improvement – proactive data governance!
Bring on the next challenge – you’ve got this! 🚀